Active directory project: How-to Guide
If you’re interested in creating an Active Directory project for your home lab using Virtualbox, then you’ve come to the right place.
In this blog post, I’ll walk you through setting up a home lab with Active Directory, Splunk, Kali Linux, and Atomic Red Team. You’ll get a hands-on look at how a domain environment operates, learn how to send events to a Security Information and Event Management (SIEM) system, and see how to simulate real-world attacks so you can detect them later.
Here’s a diagram of how the VMs will communicate and the overall structure of this Active Directory project:
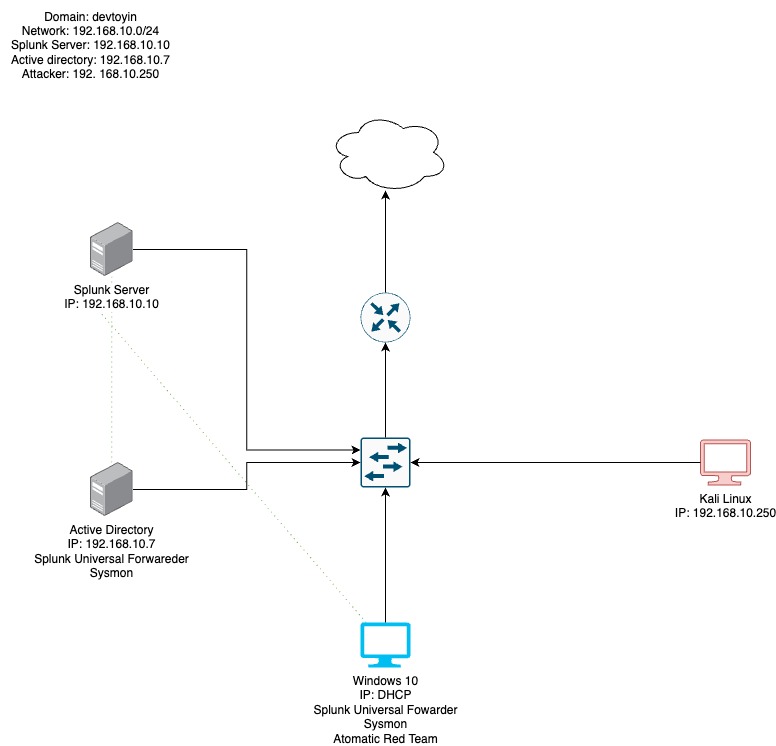
The components in the diagram all connect within a domain environment called ‘devtoyin,’ and each one has its own specific role. Here’s a breakdown of each component:
Virtualbox
- This is virtualization software that lets me run multiple virtual machines (VMs) on a single computer.
The Domain (devtoyin):
- Think of the domain as the “boss” of the network. It’s in charge of managing all the devices and users in this little network family.
Splunk Server:
- IP Address: 192.168.10.10
- This is your brainy data analyst. It gathers all the logs (think of them as digital footprints) from other devices in the network and helps you make sense of what’s going on. It’s like having a magnifying glass for all your cybersecurity detective work.
Active Directory:
- IP Address: 192.168.10.7
- This guy is like the gatekeeper. It controls who gets to access what on the network, managing all the user accounts and permissions. I’ve also added some extra tools to help send important logs to Splunk and keep an eye on what’s happening in the system.
Windows 10 Machine:
- IP Address: Gets its address automatically through DHCP (basically, the network gives it an IP address whenever it connects).
- This is your regular computer in the network. But we’ve also set it up with some cool tools:
- Splunk Forwarder: This is like a messenger, sending important data to the Splunk Server for analysis.
- Sysmon: This keeps track of what’s happening on the computer, logging things like processes and network connections.
- Atomic Red Team: This tool lets you simulate attacks on your network to see how well your defenses hold up. It’s like a practice drill for your cybersecurity.
Kali Linux Machine:
- IP Address: 192.168.10.250
- This is your hacker-in-training. It’s a machine designed for penetration testing, which is a fancy way of saying it’s used to test the security of your network by trying to break into it.
Router/Switch:
- This is the middleman that connects all your devices. It’s what lets them talk to each other and share data. Without it, everyone would be stuck in their own little bubble.
Cloud/Internet:
- This represents the connection to the outside world, like your gateway to the internet. It’s shown at the top, but for this setup, we’re mostly focused on what’s happening inside the network.
Requirements
- Virtualbox – download here: https://www.virtualbox.org/
- Windows 10 ISO image: https://www.microsoft.com/nl-nl/software-download/windows10ISO
- Windows Server 2022:
- Kali Linux: https://www.kali.org/get-kali/#kali-virtual-machines
- Ubuntu server: https://ubuntu.com/download
Install Windows 10
After downloading the above ISO images, now we can set up the VMs. We’ll start by installing the Windows VM as shown in this video:
Install Kali Linux
The default credentials to sign in to Kali Operating System is kali/kali.
Now, we have both Windows 10 and Kali Linux installed. We can go on and install the windows server and Splunk server.
Install Windows Server
Install Splunk
Now, all the VMs are setup. Congratulations!!
Install & Configure Sysmon and Splunk on Windows Target Machine and Windows Server
Download Sysmon: https://learn.microsoft.com/en-us/sysinternals/downloads/sysmon
Download Splunk: https://splunk.com. You need to create an account if you don’t have one before downloading Splunk.
Before installing and configuring Sysmon and Splunk, you need to make sure all VMs are connected to the same network in order for them to communicate with each other. Here’s how to do this:
- Remember that according to the diagram, the IP address for Splunk should be 192.168.10.10.
Install Splunk on Splunk Server
On your host machine(not the VM), you can sign in to Splunk and download splunk and set it up as shown below:
Install Splunk Universal Forwarder & Sysmon on the target machine(Windows VM)
Here’s a copy of the Input.conf file for Splunk
Install Splunk Universal Forwarder on Windows server(AD-DC )
Here’s a copy of the Input.conf file for Splunk
Install and Configure Active Directory on Windows Server and promote to Domain Controller(DC)
After doing the above, you can now configure the Active directory and promote it as a Domain controller so that the other devices can connect to the domain controller. This will help in user management and other tasks in the organisation.
Join domain on Windows 10 PC
After configuring AD and also promoting it as a DC, you can now log in as any of the users you created above to sign in to Windows 10. Here’s the video:
Use Kali Linux to perform brute force attack and view telemetry via splunk
Setup and Install Atomic Redteam and run some tests.
IEX (IWR -UseBasicParsing); Install-AtomicRedTeam -getAtomics